This guide takes you step-by-step through the process of setting up a new email account on Android.
Replace example.com with your domain name
Launch your mail application
- Start by selecting the mail icon from your applications screen

Setup email
2. Enter the email address and email password
- Choose Manual Setup

Account type
3. Choose POP or IMAP (default)

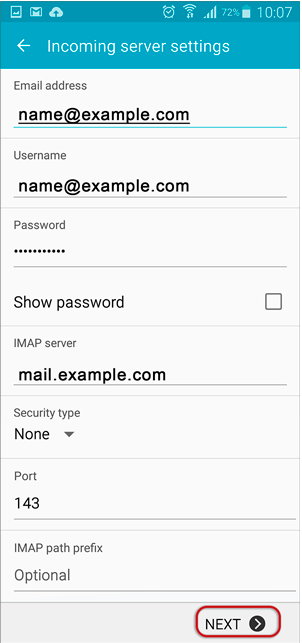
Incoming server settings
4. The programme may try to connect to the server, but will fail – you will need to add the full email address as User Name.
Check the other settings:
- POP/IMAP server is mail. followed by the domain name e.g. mail.example.com*
- Security type is SSL/TLS
- Port is 993 for IMAP or 995 for POP
- select Next
Outgoing server settings
5. Enter all the relevant details as in the screen below
- SMTP server is smtp. followed by the domain name e.g. smtp.example.com*
- Security type is NONE
- Port is 587
- select Next

Checking outgoing server settings…
6. Wait while your settings are tested
Account options
7. Adjust the additional Account Options as preferred.
Name
8. Specify an optional account name (for your reference only), and enter the name you wish to be displayed on outgoing mail, then select Done.

Complete Setup
9. The account has been set up successfully and your messages will now be downloaded.
